Archive
Lab[3] = Make Some Noise
Note: If you tried this lab on or before 8/29/2013, there was an error in the original code. Please download the code again.
Objective
- Run the Jaalaga starting code on a device
- Pick different sounds
- Update the credits screen if you use different sounds
What You Will Need
- The same setup from Lab[0] = Display Something
- Jaalaga starting code from Git Hub
- Sounds
- Record your own sounds using a program like Audacity
- Get some from FreeSound.org
Lab Version
- Version 0.3
Prerequisite
In Lab[0] we setup a development environment. Our development environment at this point includes several software tools, the AndEngine source code and our Android or Kindle Device. Among the code was a project with a wide variety of AndEngine examples. You should have reached a point where you ran these examples on your device. If you did not reach this point you should get Lab[0] working before tackling this lab because it requires a working AndEngine setup.
Introduction
In this lab we take what we accomplished in lab[2] and add some excitement with some sounds. Audio is an important element to a game because it can is another way to convey to the player what is going on in the game world. Tense music and sound effects can add an extra level of challenge to any game. In the interest of keeping these labs shorts, we will focus our audio efforts on replacing existing sounds.
Steps
Run the Starting Code for Lab 3
First you will need to get the starting code from Git Hub at the link described above. Add this project to your working setup from Lab[0]. Note, if you changed the graphics in the previous labs, you can update just the “src” folder and the “assets/sounds” folder. Compile and run the code. You should now hear sounds when a missile is fired or when a missile collides with an enemy. If you are happy with the sounds, you are done!
Update the Sounds
The source code for this lab and future labs will be marked with comments that have TODO at the beginning. This lab has x such comments
Original Sounds
The player missile fire sound is a creative commons attribution sound. Therefore the sound shows up in the credits. Here is the original sound: http://www.freesound.org/people/bubaproducer/sounds/151022/ This file is saved as playerFire.mp3 and is stored in /assets/sound/
The collision sound is another creative commons attribution sound. It is also listed on the credits scene. The original sound can be found here: http://www.freesound.org/people/Robinhood76/sounds/187647/ This file is saved as enemyExplosion.mp3 and is stored in /assets/sound/
Replace Sounds
If you want to use different sounds, replace the mp3 files mentioned above to a file with a different sound. Make sure they are fairly short because the audio pool is a small, finite size. If you load a sound that is too big to fit into memory, AndEngine will simply not play the sound.
Update the Credits
See the new file JaalagaCredits.java for code that displays the credits screen. When using sound from FreeSound.org, or any source, you should comply with the license terms. Attribute means give the author credit. Non-commercial means you can’t use the sound if you intend to publish an app for profit. Honoring license terms is the right thing to do as a content creator. If you can’t or don’t want to comply with the license terms, simply don’t use the work.
Lab[2] = Make it Collide
Objective
- Run the Jaalaga starting code on a device
- Detect collisions between missiles and enemies
- Establish good values for the ship’s speed and missile speed with the expanded game loop
- Pick better sprites for the enemy ships
What You Will Need
- The same setup from Lab[0] = Display Something
- Jaalaga starting code from Git Hub
Lab Version
- Version 0.5
Prerequisite
In Lab[0] we setup a development environment. Our development environment at this point includes several software tools, the AndEngine source code and our Android or Kindle Device. Among the code was a project with a wide variety of AndEngine examples. You should have reached a point where you ran these examples on your device. If you did not reach this point you should get Lab[0] working before tackling this lab because it requires a working AndEngine setup.
Introduction
In this lab we move beyond what we learned in Lab[1]. A new red button has been added that causes ‘missiles’ to fire from the player’s ship to the newly added enemies. Some basic collision detection has already been added to the code restricting the ships movement to the camera bounds. What is missing right now is the collision detection between the player’s missiles and the enemy ships.
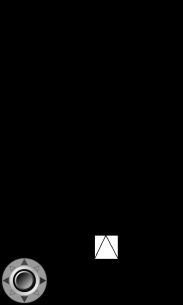
The image below displays the type of thing you should see when first running the code for this lab.
Steps
Run the Starting Code for Lab 2
First you will need to get the starting code from Git Hub at the link described above. Add this project to your working setup from Lab[0]. Note, if you changed the ship sprite by finishing the last lab, you can update just the “src” folder and the “AndroidManifest.xml” file. Compile and run the code and you should see something like the screen above.
Examine TODO Items
The source code for this lab and future labs will be marked with comments that have TODO at the beginning. This lab has six such comments
Collision Detection for Missiles and Enemy Ships
First, as be sure that you have tried to shoot a ship. What happens? A less than interesting event happens as the graphic for the missile travels right over the enemy sprite. For this part of the lab will actually try to write some code. Step by step instructions will be given, so don’t panic.
The general algorithm, or approach to solving a problem, we will implement is as follows:
For each missile, iterate over every enemy ship and determine if a collision has occurred. When a collision has occurred, remove both the missile and enemy from the screen.
The procedure above is represented in the flow chart below. Note that this flow also includes hiding rockets that have left the screen. The code you need to add to accomplish this flow is provided below.
You should add the code above to your project and run the game to see that missile impacts now cause the enemy ships to disappear. Some notes on the code above:
- A “for loop” is a way to do things in a repeated fashion. It is of the form “for( initial value; condition; end of loop action)”. The normal practice is for loops to count upwards, but this loop is a specific scenario where we may need to remove items and we don’t want to lose our place.
- We set the variable j to the last item in the enemies list
- We check to see if j is greater than or equal to zero. In other words we check to see that if we have more enemies.
- If we still have an enemy, we we execute all instructions in the loop, else we exit
- At the end of the loop we reduce the value of j so we can access the next enemy
- Return to step 2
- The recycle call in theory should return the object used for the missile to the pool to be reused. This is because making too many objects can slow down your program as “garbage” builds up and must be cleaned up. That is the theory, but in reality there is a bug in the RocketPool right now that means that the recycling/reuse is not happening. Expect this to be fixed in the next lab.
- You effectively “remove” something from the screen by hiding it and turning off updates.
Change Ship and Missile Speed
At this point, you may be saying, “I already did that in lab 1!” The need to repeat the exercise is three fold.
- The code changed in a fairly dramatic fashion. We could have had a lesson on using a difference tool, but I figured you did not have the time or interest.
- The game loop has now grown and the old values may no longer work well.
- Repetition strengthens neural pathways
Change Sprites
Something as simple as MS Paint can be used to change graphics. You can also use more advanced image editing software like GIMP (http://www.gimp.org/)
- /assets/gfx/button01.png (Width: 512 px, Height: 64 px)
- Normal and pressed graphic
- /assets/gfx/menu/logo.png (Width: 240 px, Height: 240 px)
- /assets/gfx/game/ship.png (Width: 64 px, Height 64 px)
- /assets/gfx/game/enemy1.png (Width: 32px, Height: 32px)
- /assets/gfx/game/enemy2.png (Width: 32px, Height: 32px)
- /assets/gfx/game/enemy3.png (Width: 32px, Height: 32px)
- /assets/gfx/game/playerRocket.png (Width: 5px, Height: 15px)
Lab[1] = Make it Move
11/8 Update: Significant rework since last revision
Objective
- Run the Jaalaga starting code on a device
- Restrict the ships movement to only left and right movement
- Find a ship speed that that is good for the game
- Replace the ship sprite with a better graphic
What You Will Need
- The same setup from Lab[0] = Display Something
- Jaalaga starting code from Git Hub
Lab Version
- Version 0.5
Prerequisite
In Lab[0] we setup a development environment. Our development environment at this point includes several software tools, the AndEngine source code and our Android or Kindle Device. Among the code was a project with a wide variety of AndEngine examples. You should have reached a point where you ran these examples on your device. If you did not reach this point you should get Lab[0] working before tackling this lab because it requires a working AndEngine setup.
Introduction
In this lab we will start to build our game. As we discussed in class, we will be building a game that is similar to the arcade classic Galaga. We can’t use the same name so we will just call our game “Jaalaga”. In Jaalaga you will be piloting a space ship and trying to eliminate the hostile aliens. You ship is fixed to the bottom row of the screen. Your ship can move left and right and can fire two shots at any time. Enemies move in formation and periodically break formation to dive at your ship. All ships are destroyed when they are hit by a missile or collide with another ship. In this lab we will focus of the movement of just the player’s ship.
The images below display the two screens we will see:
Steps
Run the Starting Code for the Game
First you will need to get the starting code from Git Hub at the link described above. Add this project to your working setup from Lab[0]. Compile and run the code and you should see the screens above.
Examine TODO Items
The source code for this lab and future labs will be marked with comments that have TODO at the beginning. This lab has three such comments
- JaalagaResourceManager.java (Line 208)
- ManagedGameScene.java (Line 122)
- ManagedGameScene.java (Line 56)
After reading the comments, make changes to the code based on each TODO item. You may have to look up help on AndEngine functions to change the right thing. Feel free to make a guess and verify if your assumptions were correct. When you have completed the three TODO items you have completed Lab[1].
Lab[0] = Display Something
Objective
- Run the AndEngine Examples
What You Will Need
- A computer with an internet connection
- Free Android Software (Explained Below)
- An Android device or Kindle HD device
Lab Version
- Version 0.7
Introduction
AndEngine is a set of libraries or code blocks that make creating 2D games easier. It was created by an engineer named Nicolas Gramlich at Zynga and is used by many developers as the base of games and applications. In this lab we will do the setup required to compile and run the AndEngine examples.
Video Tutorial
The following video was created by someone else, but it does a good job of explaining the process of moving from no setup to running the AndEngine examples. What follows the video is a text explanation of what the video covers along with some specific notes to make the process smoother.
Install Software
- Latest Java JDK
- Latest Android Developer Tools Bundle (Includes Eclipse and the Android SDK)
Steps
- Configure Eclipse to make it easier for debugging
- Show progress bar
- Show line numbers
- Show log viewer
- Download files from Git Hub user RealMayo
- Repositories Link: https://github.com/RealMayo?tab=repositories
- Download zip file for each repository
- Unzip all files
- My notes to make your life easier
- The default zip file name has “-<branch name>” appended to the end where <branch name> is something like GLES2 or master, remove this
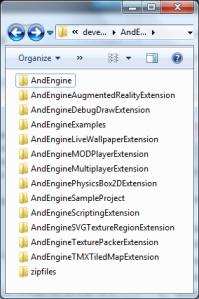
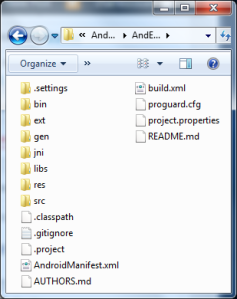
- Sometimes when Windows unzips things it adds an extra folder level, you don’t want this. A picture of the type of thing you do want in the end is shown in the picture below.
- Fix all of the names and the hierarchy before importing to save yourself some pain
- Here is what the project folders should look like
- He is what it typically looks like inside each folder
- Import all projects into Eclipse
- Download all Android environments API level 8 and above (This is going to take a while)
- Fix project build problems
- If you read the note above you will have far fewer problems than in the video. You read it, right?
- Build the project
- Run on the Examples project on a device
- Using Hardware Devices (Android)
Kindle Details
The video is not Kindle specific. Here are some extra resources to help you if you are working with a Kindle Fire device.


